
If your car has started idling like it has a little stage fright or your fuel economy has quietly taken a nosedive, spark plugs deserve a hard look. They are small, cheap (most of the time), and they do one job that matters a lot: light the air-fuel mixture on time, every time.
I have seen plenty of people get quoted scary numbers for what should be a straightforward tune-up. The good news is spark plugs are one of the best confidence-building DIY jobs out there, as long as you work clean, go slow, and do not force anything.

What spark plugs do
Each time your engine fires a cylinder, a spark plug jumps an electrical arc across a small gap at the tip. That spark ignites the compressed air and fuel mixture. When the plug gets worn, dirty, overheated, or damaged, the spark can get weak or inconsistent. That is when you feel it as a rough idle, hesitation, misfires, and sometimes a flashing check engine light.
Modern engines are picky. Misfires can send unburned fuel into the catalytic converter, which is a pricey part that does not like being used as an afterburner.
Signs your spark plugs are failing
1) Rough idle or shaking at stoplights
Worn plugs can struggle most at idle because the engine is spinning slowly and cylinder pressure is different than under load. You might feel a rhythmic stumble, a vibration through the steering wheel, or hear an uneven exhaust note.
2) Poor fuel economy
When combustion quality drops, your engine computer may adjust fueling and timing to compensate. Sometimes it can keep things smooth enough that you do not notice anything except your MPG slipping week after week.
3) Hesitation on acceleration or loss of power
If it feels like the car takes a half-second to respond when you roll into the throttle, or it pulls fine and then falls on its face, plugs and ignition components are on the short list.
4) Hard starts
Older plugs with worn electrodes demand more voltage to fire. On a cold morning, that can be the difference between a quick start and a long crank.
5) Misfire codes or a flashing check engine light
Common OBD-II codes include P0300 (random misfire) or P0301 through P0308 (misfire on a specific cylinder). A flashing check engine light means active misfire that can damage the catalytic converter. If it is flashing, drive gently and fix it soon, or tow it if it is running terribly.
6) Gas smell from the exhaust
Unburned fuel can make the tailpipe smell sharp and gassy. That is another clue that combustion is not completing in one or more cylinders.
Before you buy parts
Not every rough idle is spark plugs. Vacuum leaks, dirty throttle bodies, failing ignition coils, clogged injectors, and low compression can feel similar. Still, plugs are a smart first step if:
- You are near or past your plug replacement interval
- You have misfire codes tied to one cylinder
- The plugs have never been changed and the car has 80,000 to 120,000+ miles (depends heavily on plug type)
If you have a scan tool and see cylinder-specific misfires, you can use spark plugs as a diagnostic tool. You can swap the plug from the misfiring cylinder to another cylinder and see if the misfire follows.
Two quick cautions. First, repeated plug removal on some engines is a pain, and every extra in and out is one more chance to nick threads. Second, if the plugs are due anyway, you are usually better off replacing the set and saving the plug swap for cases where the plugs are relatively new.
If the misfire follows the plug, you likely found your culprit. If it does not, you may be looking at a coil, injector, wiring issue, vacuum leak, or mechanical problem.
Tools and supplies
- Correct replacement spark plugs (check your owner’s manual or a reputable parts catalog)
- Spark plug socket (usually 5/8 in or 13/16 in) with rubber insert or magnetic type
- Ratchet, extensions, and possibly a swivel or wobble extension
- Torque wrench that reads in inch-pounds or low foot-pounds
- Feeler gauge or spark plug gap tool (only if your plugs are designed to be gapped)
- Compressed air or a can of air, plus a small vacuum (helpful)
- Dielectric grease (optional, for inside coil boots)
- Anti-seize compound (usually not needed, sometimes not recommended, see notes below)
- Nitrile gloves and safety glasses
Optional but handy: a short piece of rubber hose (or a spark plug starter tool). You can slip it over the top of the plug to hand-thread it without risking cross-threading, especially in deep wells.
Important: Many modern engines use coil-on-plug ignition. That means no spark plug wires, just individual coils that sit on top of each plug. The job is still DIY-friendly, just a little more careful and a little more plastic to unclip.
Battery note: You usually do not need to disconnect the battery to change spark plugs. If you are worried about bumping a hot wire with a tool, or you have to remove major intake pieces, disconnecting the negative terminal is a reasonable safety move. If you do, make sure you know any radio or security relearn requirements for your car.

Replace spark plugs step-by-step
Step 1: Let the engine cool
Aluminum cylinder heads are common, and hot aluminum is easier to damage. You want the engine cool to the touch. If you just drove the car, make coffee, put on a song, and come back later.
Step 2: Find the plugs and clear access
Remove any engine cover. Identify whether you have ignition coils on top of each cylinder, or plug wires running to a distributor or coil pack.
If you have plug wires, replace or move them one at a time so you do not mix up firing order. If you have coils, you will unplug and remove each coil to reach the plug.
Step 3: Clean around the plug wells
This part is boring. It is also how you avoid turning a simple tune-up into gritty sandpaper inside your cylinder.
Blow out debris around each coil and down the spark plug well before you remove the plug. Compressed air is best. A vacuum helps too.
Step 4: Remove the coil or plug wire
Unplug the electrical connector, then remove the coil hold-down bolt (commonly 8 mm or 10 mm). Twist the coil gently to break the boot loose, then pull it straight up.
If you are working with plug wires, grab the boot, not the wire itself. Twist, then pull.
Step 5: Break the spark plug loose
Seat the spark plug socket fully. Use steady pressure to loosen the plug.
If it feels like it is fighting you hard, stop and reassess. You do not want to strip threads or snap a plug.
If a plug feels stuck: do not lean on it like you are trying to open a paint can. Try a gentle tighten-then-loosen motion to break deposits, working in small moves. If you can access the threads area (many engines do not really let you), a small amount of penetrating oil can help, but keep it controlled and keep it out of the cylinder. If the plug still feels wrong, that is a good moment to call a pro. Broken plugs and damaged threads get expensive fast.
Once it is loose, spin it out by hand with the extension.
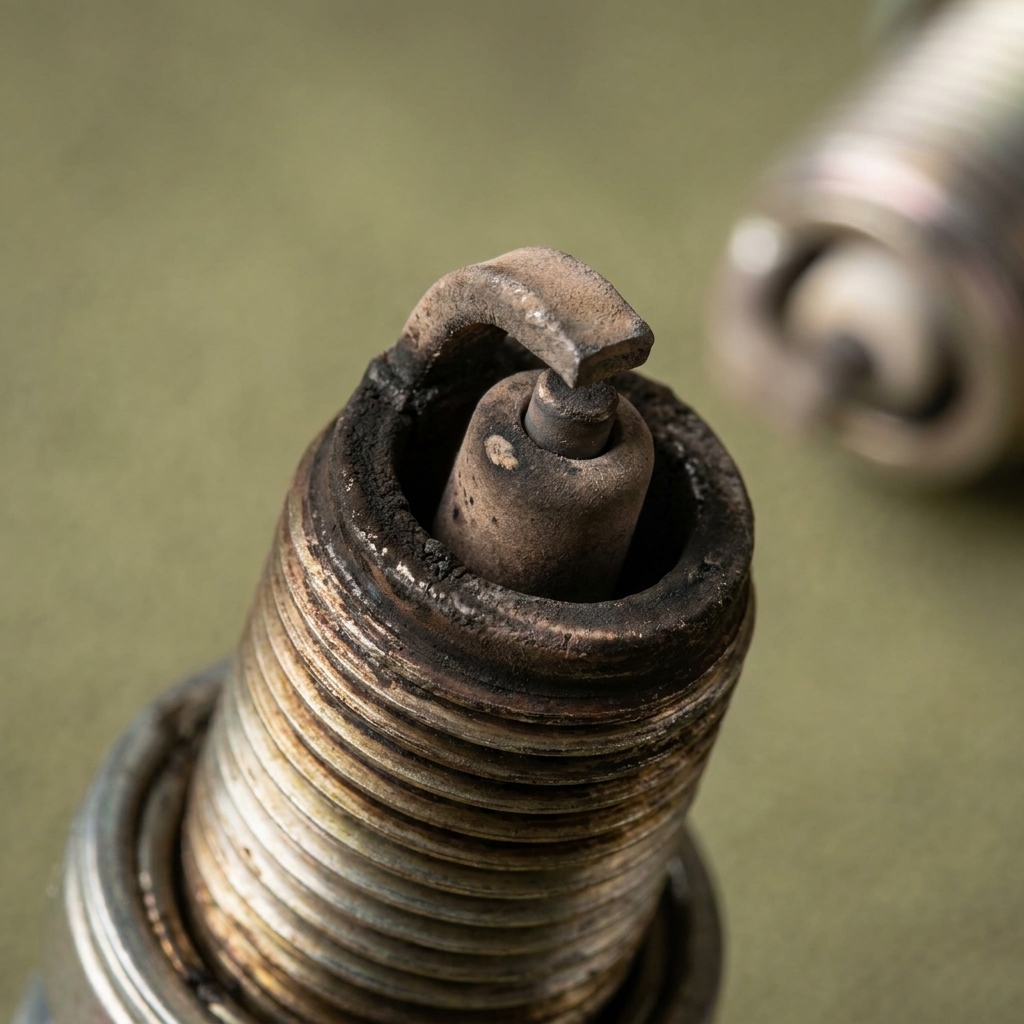
Step 6: Read the old plugs
You do not need to be a forensic scientist here. Just look for patterns:
- Normal: light tan or gray deposits, even wear
- Oil fouling: wet, oily plug can suggest oil control issues (rings, valve seals, or PCV problems)
- Black sooty: running rich, weak spark, too much idling, or short trips
- White blistered tip: overheating, lean condition, wrong plug heat range, or cooling issues
- Cracked porcelain or damaged electrode: replace and investigate why (detonation, improper gap, impact damage)
Gapping
This is where people get tripped up by conflicting advice. Here is the practical rule:
- If you bought standard copper plugs meant to be adjusted: check and set the gap to your vehicle spec.
- If you bought fine-wire iridium or platinum plugs: many are pre-gapped and the manufacturers often warn against bending the fine center electrode. Even then, you should verify the gap matches spec, but adjust only if the plug is designed to be adjusted. When in doubt, follow the plug manufacturer’s guidance.
To gap an adjustable plug, use a feeler gauge or a proper gapping tool. You want a slight drag when sliding the correct thickness gauge through the gap. If you need to open the gap, bend the ground strap gently. If you need to close it, tap the ground strap carefully on a solid surface. Never pry against the center electrode.
Install the new plugs
Step 1: Match the new plug to the old one
Before you install anything, compare the new plug to the old plug:
- Same thread diameter and reach (length of threaded portion)
- Same seat type (gasket seat vs tapered seat)
- Similar electrode design
If anything looks noticeably different, pause and verify part numbers.
Step 2: Start the plug by hand
This is my favorite rule in the garage: threads start by hand, always. Put the plug in the socket, lower it into the hole, and thread it in by hand using only the extension (or that short rubber hose trick). If it does not spin smoothly, back it out and try again.
This is how you avoid cross-threading a cylinder head, which is a real budget killer.
Step 3: Torque to spec
Use a torque wrench and follow your vehicle’s specification. If you cannot find it, check a factory service manual or a reputable service database. Torque depends on plug size, seat type, plug reach, and cylinder head material.
You will see generic ranges online, and some of them are not even close for your engine. Treat any number that is not your OEM spec as a rough example at best, not a target. Over-torquing can strip threads. Under-torquing can cause poor heat transfer and loosening over time.
Step 4: Dielectric grease (optional, use lightly)
A tiny smear of dielectric grease inside the coil boot can help prevent moisture intrusion and make future removal easier. You do not need much. Do not pack the boot full.
Step 5: Reinstall coils or wires
Push the coil boot down until it seats. Reinstall the coil bolt snugly. Reconnect the electrical connector. If you have plug wires, make sure each one clicks onto the plug.
Step 6: Repeat, then double-check your work
Before you start the engine, do a quick scan with your eyes and hands:
- All coils plugged in
- All coil bolts installed
- No tools left in the engine bay
- Any air intake tubes or covers you removed are back on

First start and test drive
Start the engine and let it idle for a minute. A smooth idle is a good sign. If you hear a loud ticking near a plug, shut it down and check that the plug is seated and torqued correctly.
If the check engine light was on for misfires, you may need to clear codes with a scan tool after the repair. Some cars will self-clear after a few drive cycles, but clearing codes also helps confirm the fix.
Common mistakes
- Cross-threading: always start plugs by hand using just the extension.
- Over-torquing: use a torque wrench and the correct spec.
- Breaking a coil connector clip: release tabs gently, use a pick tool carefully if needed.
- Mixing up plug wires: swap one at a time if you have wires.
- Dropping debris into the plug well: blow out the area before removing the old plug.
- Using the wrong plug type: stick to OEM spec heat range and design unless you have a specific reason.
- Dropping a plug in a deep well: use a socket with a rubber insert or magnet, and lower it in slowly.
Anti-seize
This is one of those garage debates that will outlive us all. Here is the clean takeaway:
- Many modern spark plugs come with plated threads designed to install dry.
- Some plug and vehicle manufacturers advise against anti-seize because it can alter torque readings and lead to over-tightening.
If the plug manufacturer says install dry, install dry. If a service manual specifically calls for anti-seize, use a tiny amount and reduce torque accordingly per the manual. When in doubt, dry install with correct torque is usually the safest move on modern plated plugs.
FAQ
How often should spark plugs be replaced?
It depends on plug type and vehicle. Copper plugs might be 20,000 to 30,000 miles. Platinum and iridium plugs commonly run 60,000 to 120,000 miles. Your owner’s manual is the real answer.
Can bad spark plugs cause poor fuel economy?
Absolutely. Weak or inconsistent spark can lead to incomplete combustion, and the engine management system may adjust fueling to compensate.
If one plug is bad, should I replace all of them?
Most of the time, yes. If one is worn out, the rest are usually close behind, and replacing a full set keeps cylinder-to-cylinder performance consistent. The exception is if you just replaced them recently and one was damaged by something else.
What if I replace the plugs and it still misfires?
Next suspects are ignition coils (or wires), coil boots, injector issues, vacuum leaks, and mechanical problems like low compression. Cylinder-specific misfire codes plus a simple parts swap test (swap coils between cylinders) can narrow it down quickly.
One last tip
Lay your tools out, keep your plugs in order, and take your time. Spark plugs reward patience. Do it once, do it clean, and you will not just fix a rough idle. You will also feel a little more in charge of the machine you rely on every day.